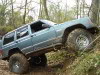
reson46 Posted March 21, 2008 Posted March 21, 2008 '88 long bed that I built for my wife. Before: It was 2WD with the Peugeot 5 speed and D35. She wasn't a big fan of the manual transmission. I didn't like it either, but for other reasons. :D After: First trip on the trail: It now has an AW4, 231 doubler, TNT long arm front suspension, spring over with 8.8 rear, ECTEDs front and rear, 4.88 gears, 35" Mickey Thompson Baja MTZs, and some other stuff. I've got lots of pictures along the way. I'll add them with the details as I have time. I'll probably start on rock sliders this weekend. Then a rear bumper since we practically ripped off the stock one. I plan to get a Warn M8000 winch and build a front bumper around it in the near future. Willy
Mitch Posted March 21, 2008 Posted March 21, 2008 Nice jeep! looks like your making a replica of your neighbors? chevy! I am liking the long arms a lot!
Drahcir495 Posted March 21, 2008 Posted March 21, 2008 Very nice! Welcome to the club :cheers: - Rich
reson46 Posted March 21, 2008 Author Posted March 21, 2008 Nice jeep! looks like your making a replica of your neighbors? He built that for an entirely different purpose. It's a mud truck. It's kind of sad. Since he got married it spent most of its time parked in the back yard. :( Willy
reson46 Posted March 21, 2008 Author Posted March 21, 2008 We didn't even get the joy of putting the first dent in it. We only had it for a couple of weeks when a drunk side swiped it and took off. Luckily the neighbors got the license number and the cops found the drunk a couple of blocks away. She just missed my brand new Dodge that was parked right in front of the MJ. I would not have been happy about that. The good thing is that the drunk paid for the long arms. :D Willy
reson46 Posted March 21, 2008 Author Posted March 21, 2008 Here's the TNT long arm front suspension. I also ordered their track bar and track bar bracket to get rid of the stupid stock tie rod end. One of the boxes. Belly pan. Control arms. Track bar and bracket. Upper control arms and hardware. I had wheeled with Bob, one of the owners of TNT, in Moab a couple of years ago. I talked to him quite a bit and was really impressed with their products and the thought that went into them. I knew that if I ever built another XJ or MJ I was most likely going to use their stuff. When we picked up this MJ I called him up and discussed what I had planned. I wanted to use their Y-link front suspension and belly pan with the 231 doubler. I wanted to make sure that both transfer cases were protected by the belly pan. I gave him the length the doubler would extend the drivetrain and he extended the rear of the belly pan for me. I was very happy with TNT's customer service. I almost always talked to Bob, one of the owners. I don't think that happens with most companies. :D He was also more than willing to discuss the different options for what I wanted to do. I would definitely recommend there stuff to anybody. Willy
reson46 Posted March 21, 2008 Author Posted March 21, 2008 how do you like the ecteds? So far so good. Only one wheeling trip with it at this point, but they worked well. Very quiet. No clunk or anything when they engage. Willy
reson46 Posted March 21, 2008 Author Posted March 21, 2008 Along with the suspension I started collecting other parts. I already had a D30 out of a '98 XJ as well as a NP 231 to use for the front half of the doubler. I had a buddy who new a guy getting rid of an XJ of the same year. He wanted $200 for it and four of us all wanted different parts off of it. So it came out to $50 bucks for each of us. I got the AW4 as well as the computer, all the wiring, and any other little brackets I would need. I also ended up using the seats and instrument cluster (the MJ had the dummy lights) from the XJ. Also bought the tires for it. Picked up an 8.8 with disc brakes. As well as the doubler. Willy
reson46 Posted March 21, 2008 Author Posted March 21, 2008 Here are a few in progress pics of the suspension going on. Progress was a little slow at this point as I was swapping over the transmission, swapping over wiring, installing the suspension, and looking for a new house at the same time. Because of this the city wasn't too happy with me having a couple of vehicles on jack stands in the driveway. :oops: So, both the parts XJ and MJ made a move to the back yard. Willy
reson46 Posted March 21, 2008 Author Posted March 21, 2008 Here are a few shots of the doubler going together. It's a Box4Rocks 231 doubler from D&D Machine. There is a thread on the Pirate 4x4 vendors forum about it. These show the shortened shift rail and main shaft. Both are included in the kit. The front output needs to be cut off and an aluminum block off plate is welded in the hole that is left. Here I am figuring out where I need to cut. Here it is after I chopped off the front output. I then shaped the aluminum block off plate so that it fit in the hole that was left. Just came back from the welding shop. I don't claim to know how to weld aluminum. :D The following pics show the doubler on the front of an Atlas. I was setting this up for a Scout project that I am working on. I didn't have the second case that I was going to use for the MJ at this point. Adapter ring that installs on the front of the rear case. This plate then installs on that ring. The front case then bolts to the second plate. I'll post up more later. Willy
Galford Posted March 22, 2008 Posted March 22, 2008 Looks great! Oh and hey, Your just down the road from me.
purplexj Posted March 24, 2008 Posted March 24, 2008 You cheated, you started wih a nce mj. I started w a 2x with ba 5 spd too. My friend stripped a 2door just for the eng. I got the aw4, d30 and d35, comp and tilt/cruise/int wipe column.
reson46 Posted March 24, 2008 Author Posted March 24, 2008 You cheated, you started wih a nce mj. I started w a 2x with ba 5 spd too. My friend stripped a 2door just for the eng. I got the aw4, d30 and d35, comp and tilt/cruise/int wipe column. At least you have tilt and intermittent wipers. :D Those are a couple of additions I would like to make one of these days. Willy
reson46 Posted March 24, 2008 Author Posted March 24, 2008 No real tech with this one, just like the pic. :D Willy
reson46 Posted March 24, 2008 Author Posted March 24, 2008 Found some pics of the MJ's doubler going together. Rear transfer case on the left, doubler case on the right, adapter ring in the middle. Adapter ring on the rear case. Second adapter between the two cases. Second adapter mounted to the rear case. The shift rail needs to be mounted to the adapter next. Here are the two cases together. You can also see the beginning of the extra mount I built to support the extra weight and torque of the second case. More details on that to come. Test fitting everything. You can see where the floor was in the way. A sledgehammer worked well to gain the necessary clearance. :D A shot from the front. A couple of pics of both cases together with the finished mount. This shows everything in the jeep after I cleaned up the area I clearanced and painted. Willy
reson46 Posted March 24, 2008 Author Posted March 24, 2008 I didn't feel comfortable hanging the weight of two transfer cases off the rear of the transmission. I've seen the rear of transmissions break under a lot less stress. I ended up building this mount off the back of the front case using an extra leaf spring bushing that I had. This is the part that mounts to the case. With the bushing. With the foot that mounts to the belly pan. A couple of pics of it mounted to the belly pan. I wanted to keep the bottom of the belly pan completely flat so I counter sunk the bolts. End result with it mounted in the MJ. Willy
reson46 Posted March 24, 2008 Author Posted March 24, 2008 Now that it had two transfer cases, I had to figure out some way to shift both of them. This ended up taking a lot longer than I expected. There was a lot of assembling, thinking, disassembling, change something, thinking, assembling, repeat, repeat, repeat........... It was pretty frustrating and I was glad when it was over. I could have used the stock shifter for the front case, but I think the stock shifter is a completely ridiculous design. In my opinion, even for a unibody vehicle, mounting the transfer case shift linkage to the body is just asking for problems. Adding things like motor mount lifts and crossmember spacers just adds to the problem. I've wasted too much wheeling time under TJs repairing the shift linkage to even consider this. So, to completely eliminate that problem, all linkage and shifters are mounted to the drivetrain. This shows the linkage from the bottom. Here are what the shifters look like from the inside. Willy
reson46 Posted March 24, 2008 Author Posted March 24, 2008 Now that I had the drivetrain together at this point I could start setting up the 8.8 for the rear. I ground off all the stock brackets and bolted it in sitting on some MORE anti-wrap spring pads. I then measured for driveshaft length and ordered one from Tom Woods. Once the driveshaft arrived I was able to set the pinion angle and tack the spring pads on. Here it is removed for final welding. I cut the shock mounts off the stock D35 spring plates and used them on the 8.8. Painted and installed. Willy
reson46 Posted March 24, 2008 Author Posted March 24, 2008 I went with a Riddler differential cover for the front. Very nice and it comes with hardware. For the rear I went with Ruff Stuff only because Riddler wasn't producing their 8.8 covers yet and I didn't have time to wait. It is very tough, but I wouldn't buy another one. I had to enlarge a couple of the bolt holes because they didn't line up and it didn't come with hardware. Also, I'm not really concerned about the pretty little half circles on the outside of the cover, but if you are going add those at least make them line up with the differential. Willy
reson46 Posted March 24, 2008 Author Posted March 24, 2008 I trimmed the fenders and moved the flares up. Willy
reson46 Posted March 24, 2008 Author Posted March 24, 2008 For the front driveshaft I already had a stock one and I didn't want it to hang down really low, especially with the high clearance TNT arms. I ended up using the carrier bearing and driveshaft out of a Mazda B truck. I had the driveshaft shortened and mounted the CV yoke from the front output of an NP 231 to it. This allowed me to attach the stock front driveshaft to it. Before having it shortened. After having it shortened. Willy
reson46 Posted March 24, 2008 Author Posted March 24, 2008 I built a mount for the carrier bearing to bolt to. Willy

Recommended Posts
Create an account or sign in to comment
You need to be a member in order to leave a comment
Create an account
Sign up for a new account in our community. It's easy!
Register a new accountSign in
Already have an account? Sign in here.
Sign In Now