btm24 Posted September 6, 2010 Share Posted September 6, 2010 I have been a member for a while and have just been to lazy to start a build page. i try rly hard to take lots of pics of EVERY THING which only works about half of the time. any ways i got started at http://www.cardomain.com/ride/3859502 and it will be easyer to go there for more info for a while. Ill upload pics asap. thanks Brandon Link to comment Share on other sites More sharing options...
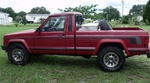
btm24 Posted September 7, 2010 Author Share Posted September 7, 2010 ok so its takin me a few days but hear we go. This is my 1989 jeep comanche pioneer which i got though a trade for my 1995 ford taurus. the car was is fair conditon so i say since kbb says its worth 1.1k and i payed the old guy 100 on top of the car i payed about $1,200. some times i miss my nicer car but i tore the hell out of it and it was time for me to get a truck :D I'm going to start out with my to do list 1.)rpm insterment cluster $50 2.)rear bumper $80-200 3.)recalabrate odomder ?$ 4.)fix dome lights ?$ 5.)Idle air contal valve $70 http://www.autozone.com/autozone/parts/ ... ing=search 6.)Rear speakers $50 7.)Lift kit 3”-6” $300-700 8.)cb radeo Putin in. $20 9.)new head lights $60 http://www.quadratec.com/products/97009_02.htm 10.)paint job $500 11.)Brush gurd $180 or tube bumper 12.)snorkel $300 or K&N 13.)flow master exuast $190 or http://www.summitracing.com/parts/WLK-17655/ 14.)spary on bed linner $500 15.)air conditioning $1,000 16.)4x4 convertion (transfer case, front dana 30/ tranie and rear dana 44) $2,500 17.)Front dana 30 and rear dana 44 diff covers 18.)Rocker rails or runing bords $400 19.)as of 8/15 $6,690 20.)bosh windsheld wipers $40 I know bad spelling but I'm lazy and just copy and pasted it from my note pad list so... any ways i get 25k when i turn 18 and i wish i could spend it all on my truck i need to save as much as i can so I'm only spending about 5k on the truck. sadly with having a dirt drive way, my dad to old and not willing to, and me not knowing what the hell to do, i found a local shop in town that I'm going to use for the 4x4 convert and the lift. for labor not parts hes going to charge me 900 flat and make me some rocker guards. I'm starting looking for a jeep cherokee that i can part out for a dana 30, 44, ac and a bunch of other things the guy in town will take out for me. after that i will try and do as much as i can maby clear 1 thing off of my list every month or so. any ways This is what it looked like the day I bought it. The last people who owned it never fixed any thing and just let it run into the ground:( all 4 tires on it were used even the spair was a used tire. some rust but not so bad the people were from Ohio which explains the rust :( not to bad tho: I liked the running boards at first but when i took them off for my new tires it looks way better. now one of the first mods i did was paint the "jeep" on the tail gate with and since i rly liked the way it looked with the faded paint ive painted every thing since then with that paint. this is what the letters looked like: i know the pic is newer but its a good 1. anyways since then ive added alot of things but ill start off with like seat covers with bullet chains, "Jeep" floor mats, tool box, spare tire, new 31" pirelli scorpion atrs, and a chrome tail peace. the old tires were used and one of them had a huge bubble in it:( they ride nice on the road and handle rly nice off road. there is alot more to tell but all for now hope yall enjoy my build Link to comment Share on other sites More sharing options...
MancheKid86 Posted September 7, 2010 Share Posted September 7, 2010 i was looking on page 3, is that all camber on ur wheels? or is your wheels unbolted and just chillen? Link to comment Share on other sites More sharing options...
btm24 Posted September 7, 2010 Author Share Posted September 7, 2010 i was looking on page 3,is that all camber on ur wheels? or is your wheels unbolted and just chillen? Unbolted lol they wouldnt let me in the bay for better shots :fs1: Link to comment Share on other sites More sharing options...
btm24 Posted September 12, 2010 Author Share Posted September 12, 2010 ok so i know its been a bit its hard keeping up both cardomain and this but I'm trying. any ways so my first rly good mod was my new pirelli scorpion atr's. the cost was about 633 and i added nitrogen to them since i do alot more city and highway driving then i do off road. its sad that i could only fit 31's when i wanted 33's but the old tires were rly bad and dry rotted. hear are some pics: They look rly nice and i do have that rub i believe i read it was the lower control arm? idk anyways hear is a full list of every thing ive done so far. again this is my list so its full of spelling errors Mossey oak camo seat covers, black "Jeep" floor mats, paited tail light ribs black, flirs painted black, "Jeep" painted black, emblems added (4.0 liter/Comanche), new tires 31" pareli alterans, new cigeret lighter, tool box, miss. Tools, tow cable, starter, all pulleys, water pump, 100 watt alternator, drive belt, 4 oil changes and now a bosh oil filter, painted valve cover black, window trim painted black, changed coolant twice, spark plugs, sway bar in links, painted grill black, door handles black, camo visor covers (2), passenger mearer with light, painted meairs black, painted windshield wiper arm black, antenna holder painted black, am stickers added to tail gate and glove box, rear window stickers, windshield wipers, font tag, rear window stickers, steering wheel cover camo, steering wheel clock, new wheel bearings, front fog lights, exhaust re bent, Chrome tail piece, another tow chan, Radeator hose, pioneer Radio, front tow hooks, painted front flairs, and front bumper the cost so far is about $2,200 and theres alot to be done. so for now thats as much of an update as i can give yall tonight ill have more tomarrow. again if you want a more up to date go to http://www.cardomain.com/ride/3859502 Link to comment Share on other sites More sharing options...
btm24 Posted October 1, 2010 Author Share Posted October 1, 2010 so its been a bit since ive posted let me put more on what i have allready done since my um funds are not that great :oops: so hear is the first time i rly went off roading. this is by my house lets just say you can't just go there when there are other people are around :roll: its a fun field to did some ruts in and spin my wheels :brows: a flex pic :rotf: the only other time i have takin her off road is when i did a allrighter going though my friends dads 100 acre yard :clapping: and when i hydro locked my motor out at the lakeland mud bogs :roll: and i will wait untill i get a 4x4 under her. and a lift. i do some light off roading when i go though the woods behind my house and down small dirt roads. hear are the only pics out at lakeland: thats my bro's truck :bowdown: any ways i did great didnt get stuck untill i uh @#$%ed up my engine :wall: I'm going to make sure that next time that won't happen. ok well thats all for now see ya Brandon Link to comment Share on other sites More sharing options...
btm24 Posted October 5, 2010 Author Share Posted October 5, 2010 ok time for an update of what ive done months ago. after i sunk my truck me and my dad had to pull the head to see how bad it was(not bad at all :chillin: ) so since it was off the road for a few months i needed to do some other things so i took it all apart. well let me start off with the pic's of pulling off the head: well after we pulled the head off we found nothing bad. meaning no marks on the cylinder walls which would have ment a bent or snapped rod. so after we got a new gasket set for 60 bucks me and my dad put it all back together. now since my dad had work and i had no idea what to do this all took about 2 mouths. well after i had to replace a starter which was 22 years old she cranked right up. hear is a pic of the water coming out of the muffler when it ran: and one of my dad which has helped me ALOT with this truck. well in the end of all of that it ended up better then ever because it got she got a good flush lol it needed one anyways it had a lot of carbon build up. so for now thats it, it won't be long b4 i update again thanks yall for lookin Brandon Link to comment Share on other sites More sharing options...
Comanche County Posted October 8, 2010 Share Posted October 8, 2010 Nice, keep up the good work! Link to comment Share on other sites More sharing options...
buxmj Posted October 9, 2010 Share Posted October 9, 2010 Great work already, keep it up! Hope to see you zooming down I4 someday, unless it's in traffic and then we'll both be stopped and then we can talk about our mj's!!! Link to comment Share on other sites More sharing options...
btm24 Posted October 9, 2010 Author Share Posted October 9, 2010 zooming down I4 someday, unless it's in traffic and then we'll both be stopped and then we can talk about our mj's!!! :rotf: :rotf: :rotf: :rotf: :rotf: :rotf: thats a good one. i have many plans and yet when it comes to get down and dirty its trying to find out what parts you rly need is the hardest thing to do. Thanks tho i rly need to up date so far last weekend i fixed my floor board, painted it with rust stopping paint, put the carpet back on and put in the headlinner :banana: but sadly due to this FL heat it fell (and because me and my dad had no idea how to put it on) @#$%ed up the corners and did not use enough spray :rant: so at least its not so loud in the cab any more :D and only the midle fell so what ever. now this week some time I'm waiting on my new bumper!!! i was told by the guy at a shop that i would have had it 4 weeks ago :shake: so who knows when I'm getting that :rotf: and my dad leaves sunday for las vegas auto show for his work for motor age magazine. so no work will be done this weekend :( ill update it by the end of tomarrow, with alot of stuff. thanks all Brandon Link to comment Share on other sites More sharing options...
buxmj Posted October 9, 2010 Share Posted October 9, 2010 Ah the Florida heat, I think I'm on my third headliner, third paint job, at least 10 rad overflow caps, 2nd ac unit, but I guess I will take that with NO RUST!!!!! Link to comment Share on other sites More sharing options...
btm24 Posted October 9, 2010 Author Share Posted October 9, 2010 Ah the Florida heat, I think I'm on my third headliner, third paint job, at least 10 rad overflow caps, 2nd ac unit, but I guess I will take that with NO RUST!!!!! :rotf: thats so true! u have ac? lucky! Brandon Link to comment Share on other sites More sharing options...
btm24 Posted October 10, 2010 Author Share Posted October 10, 2010 ok so hear it is. hear is me painting the grill, front bumper, fender flairs, tow hooks(that i have to install), antena bottom, valve cover, meirors, and door handles. i used a very forgiving paint the same i used on the "jeep" on the tail gate when i first got the truck. just a bit of paint went along way and made a real diffence to the look of the truck. rustoleum spray bed liner I liked the old rough look for the old rough truck The tow hooks i have yet to install on my front bumper: Antenna Base painted: Painted Door handles: This is B4 i painted the grill. only had to take a few screws off to get the grill plate off look at just how much better it looks just a $9 can of paint :) front bumper: They looked so bad My bumper is thanks to the guy who kept snaping me trying to pull me outa the mud :( ill get a new one sooner rather then latter tho :D I rly like the look i got the idea from a guy on the club :D This is when i first pulled the head to remove the rest of the water and what not. any ways this is what the cover looked like b4 i cleaned it. took about an hr to scrub but wow it looked new after i cleaned it up. I did not however paint this with the bed liner i painted it with black high temp paint that my bro used on his car a few years back. It gave it a rly nice clean look and will last 4ever :) It came out rly nice I looked silly runnin around with 2 black flairs and 2 faded red ones but thats fine :) ok so this is about a month after my trucks been on the road i found the time to paint the front ones: B4 i started After i started to paint I was painting the front bumper that is why it is off.er. over all it turned out rly nice i don't think my truck has ever looked this good. that paint i used was very forgiving I also painted the windsheld wiper arms and if i could remove both arms i would also paint the cowl but i can't :( the truck looks a lot better just with a few things painted. it took for ever to get every thing painted but I'm glad i did it :jump: ill update more latter tomarrow hope yall like what ive done :D Brandon Link to comment Share on other sites More sharing options...
btm24 Posted October 10, 2010 Author Share Posted October 10, 2010 ok time for yet another update :D I'm going to start with the floor board rust. Thanks to Pete M. who allways says to pull up your carpet i found rust holes in the drivers side floor pan :( it took about two months but i had shop class at school fix it for me. they pop riveted some sheet metal on top of the holes.The holes got worse when i had the carpet out (for 2 months) and had got so big i could fit my fist in one. hear are some pic's when i pulled the carpet when it was off the road: now you remember this? yeah well that was not all because it was coming though the door, i was wrong it was coming though the floor :ack: so all that mud i had to clean out of my carpet yeah that was fun...not. any ways this is the floor after shop fixed it ok so now we had to remove every thing to put the carpet back in, and the head linner. hear are all the tools laid out in the bed: me cleaning the carpet: so B4 i put in the carpet i painted the floor with rust stopping paint : and this is as I'm putting in the seat after the carpet is in. no shots of putting in the carpet: this is the carpet i think it cam out great : and now the mats ok now that i had the carpet in, but B4 i put the seat in i put the new headlinner in. it looked great other then the corners but hey me nor my dad had ever done headlinner B4. so this is B4 i pulled it out it was falling: this is after taking the back board out: I had to use duck tape to fix this: This is the spray glue i used it was ok this is the headlinner B4 i put it in the truck and after: it turned out rly nice but sadly because of this FL heat(and because we didnt use enough glue) it fell in the middle so i guess its going to be fine. I'm so glad I have carpet again i burnt my right leg so many times on the center. lol and its nice that the headlinner dose not hit my head any more :banana: so for now thats it ill get more up within a few hr's. hope yall like Brandon Link to comment Share on other sites More sharing options...
ComancheKid45 Posted October 11, 2010 Share Posted October 11, 2010 Nice Job, its great what a few hours of your time can acomplish without a whole lotta money :thumbsup: Link to comment Share on other sites More sharing options...
btm24 Posted October 11, 2010 Author Share Posted October 11, 2010 ok here's yet another update on my build. i was hoping to start this one out with my build list from chrysler that ive had for months but because i was tired when i cleaned out my email last week i got rid of it :wall: and that was my only copy :( so now ive sent another email to them and will have it back again by the end of the week. so since i can't do that ill start it out with an updated todo list. as you may see i have taken alot off but added alot more: 1.) 2.) 3.) Fix turn signal $10 http://www.comancheclub.com/forums/view ... =2&t=25995 4.)fix front bumper 5.)put front fog lights on 6.)put front tow hooks on 7.)fix dome lights ?$ 8.)rear bumper $20-$80 9.)10" sub woofer $30 10.)recoveroy strap $30 http://www.summitracing.com/parts/SMT-CC330/ 11.)Lift kit 4.5” $617.71 with add ons (shock boot, nitro shook upgreade, steering stabilzer) http://www.roughcountry.com/jeep_mj_4.html 12.)4x4 convertion (4x4 jeep cherakee part out and dana 44 or 8.25 or ford 8.8 rear axle) $2,500 13.)front and rear differatol covers $150 http://www.jeepyard.com/jeep-parts/prod ... =65&page=5 14.)Revory hitch $80 http://www.tigerhitch.com/products.htm 15.)new insterment cluster $100 and recalabrate odomder (has to be cable driven, need oil pressure, water tempreture senders) 16.)cb radeo Putin in. $20 17.) Idle air contal valve $70 http://www.autozone.com/autozone/parts/ ... ing=search 18.)Rocker rails $400 19.)bosh windsheld wipers $40 20.)Flow master exost $190 21.)Brush gurd $180 22.)spary on bed linner $500 23.)paint job $1000 24.)air conditioning $1,000 25.)new head lights $60 http://www.quadratec.com/products/97009_02.htm 26.)front, fuel tank, and t case skid plates 27.) lockers http://www.aussielocker.com/index.php/lockers.html again i am sorry about the spelling but this is just my list copy and pasted so what ever. and the rest is going to be my new radio and whip, hope yall like Ok so this was my old crap radio that just kinda went out one day. which was fine cuz there was no volume control so it was eather on and rly loud or off lol so after about 2 months with out a radio my moms friend offered me this PIONEER DEHP3600r for free!!! lets just say that a $200 radio for free made my day. its xm ready 50watt X 4 and wow dose she sound good!!!! i paid $25 to get it installed :rotfl2: Didnt use a wiring harness the guy spliced the wires together. look at how it looks at night! I'm getting trim soon to go around it but for now who cares Ok and so soon after i got a new radio my friend bubba gave me a 6 foot whip antenna. so i though a bracket together drilled a hole in the back of the tool box and put her on. now all's i need to do is get my cb hooked up Thats the bracket i made. not to much to look at but it holds. all and all I'm happy with both the radio and whip. i just wish i had the $ for the wiring for the CB :( well wow i thank that this is all up to date :jump: ill update it as things happen like if i ever get that bumper but :dunno: thanks for taking your time to check out my truck Brandon Link to comment Share on other sites More sharing options...
btm24 Posted October 11, 2010 Author Share Posted October 11, 2010 ok just a fast update. I got the e-mail back today from chrysler with my build list. which aint bad cuz i emailed them at 11 at night :clapping: so hear it is: According to our records, your vehicle was equipped from the factory with the following: Sales Code Description *E1 Cloth Bench Seat ALM Liberty Jet Group APAS Monotone Paint BCXS Nickel Metal Hydride Battery BGAS Power Front Disc/Rear Drum Brakes BKPS 10x2.5 Rear Drum Brakes CBAP Straight Back Bench Seat CKAS Carpets - Floor and Cargo Area CSRS Passenger Assist Handles DGB All 4-Speed Automatic Transmissions DGSS 4-Speed Automatic AW4 Transmission DHAS Lock-Up Torque Converter DHTP Elec,Shift-on-the-Fly,P/Time T/Case DMDS 3.55 Rear Axle Ratio DRJS 175MM Rear Axle EAAC All Engines GACS Tinted Glass Windows GBBS Tinted Windshield Glass GCBS Front Door Tinted Glass GEHS Fixed Door Vent Glass GNAS Rear View Day/Night Mirror GRZP Left Remote Mirror GSZP Right Remote Control Mirror GTZA Manual Remote Mirrors HCDS Heater w/Instrument Pnl Ventilation JAAS Instrument Panel JAZS Analog Instrument Cluster JCAS 85 MPH Primary Speedometer JHAA Var Intermittent Windshield Wipers JJAS Cigar Lighter JKBS Inst Panel Mounted Hood Release LAFS Key in Ign/Seat Belt Warning Buzzer LBCS Glove Box Lamp LMAS Halogen Headlamps MBJS Black Front Bumper MB1S Black Front Bumper MDAP Front License Plate Bracket MFGS Body Color Headlamp Bezels MHAS Black Windshield Moldings MMCS Upper Door Frame Moldings MMGS Belt Moldings MMKS Body Color Drip Trough Molding NAAS Federal Emissions NBKS EVAP Control System NDAS Catalytic Converter NF2S 18.5 Gallon Fuel Tank RAAC All Radio Equipped Vehicles RABA AM/FM Radio RCDP 4 Speakers SBAS Power Rack and Pinion Steering SCES Alcantara Wrap Steering Wheel SFAS Standard Duty Shock Absorbers SGAS Rear Shock Absorbers TAAC All Tires TBCS Compact Spare Tire TBMS Tire Carrier Winch TPFA P205/75R15 BSW All Season Tires WJM 15X7.0 Chrome Wheels XBSS Pickup Box XFAS -35F Protection Anti-Freeze YAAS Build To U.S. Mkt. Specifications YGGA 9 Additional Gallons of Gas Z01P Rear Spring Group I Z58P Left Front Spring Group Viii Z78P Right Front Spring Group VIII i don't know what most of it means but it has helped alot. i advise every body to email them asap if you have not allready because ive heard that chysler won't do it for trucks over 22 years old. Thanks for takin your time to check it out. Jeep On! Brandon Link to comment Share on other sites More sharing options...
btm24 Posted October 23, 2010 Author Share Posted October 23, 2010 So it has been a bit since i last posted so i think its time for an update. i have not done much due to school :( . I mounted my fog lights with all hopes of wiring them up and tackling some electrical problems like the dome lights having a bad ground and the turn signal lights coming on when i turn my lights on. So since mounting them fog lights was such a pain i did not get them very tight since i wanted to move them around when i got them working to have them line up. so i had to take one off because it was about to fall off and did not want to deal with the time to get it tight again. so now i have one fog light that dose not even work, that black flap is still hanging under my truck because i need to get around it to get to the fog light scerws and do not want to put it back up untill i get them lights working, i still have not gotten a new bumper and due to me driving a bit "hard" while i have a lot of wood in the bed ( like 3000 lbs) the bumper is now just sitting on the broken bracket and will fall off very soon :( . how ever there is good news, i got a newer subwoofer from a friend for $30 bucks :clapping: and a new front tag that i got at the sunbelt ag expo the other day with FFA, for 5 bucks :D the sub is in a huge really nice box that i do not what to chop up to make it fit behind my seat so now i will have to use an hold house speaker box to chop up and the back of the nice box to wire it up. I will put that in maybe tomarrow but :dunno: i might wana do that when i do the electrical stuff. so hear are some pics of the tag and silly looking one fog light and the lights when i got them (i got them for free from my GF's dad and have had them for 2 mouths now): so yeah my truck looks kinda bad but thats fine it will look good soon enough :banana: And i do have somthing kinda funny. last night i had a bonfire with my GF's a few friends and a few of her friends. anyways when it got kinda late i had to take my GF home and she lives on a very long dirt road. well this was about 12 at night, so after i dropped her off and when i had left her drive way i thought that i was pulling over on solid ground to call my friends to see if they wanted me to bring some food back, any ways i did not pull over on to solid ground i had started to pull over into sugar sand and had to walk back to her house and knock on the door to see if they could pull me out. so her mom cam up to the door in her red pj's lol and since her dad was hunting had to try and take her ford explorer to pull me out but since 1st i have no where to hook up my tow strap in the front and cuz i didnt want her to get stuck. so she told me to do somthing she used to do when she would get stuck in the snow which i had never had happen. i had to "rock it" which means i had to put it into drive then reverse while hitting the gas over and over again untill i pulled out. so now today is home coming and her dad is home and my gf said her dad is going to rip me up about getting stuck :rotfl2: i guess its true you really do learn some thing new every day :rotf: ok well yet again i hope yall enjoyed my build so far and will update asa somthing happens. thanks Brandon Link to comment Share on other sites More sharing options...
btm24 Posted October 26, 2010 Author Share Posted October 26, 2010 So to day my "friend" said hey give me the sub and box and ill make it fit into your MJ. ok so a few hr's latter he tells me its done i come over to see it and he @#$%ed the entire box up :( yeah thanks alot for that so now i gotta either try and fix his @#$% up or make my own box :mad: all i want is a lit bit more bass in the songs, thats not asking for much is it? oh and then he said he "felt bad" and offered me his JL sub woofer and box for mine and i was like no. so now i have even more work ahead of me. thats ok Brandon Link to comment Share on other sites More sharing options...
Bounty Hunter Posted October 26, 2010 Share Posted October 26, 2010 Please, do not install those hooks on your truck. Those hooks are designed to be attached to a length of chain, not mounted to a vehicle for recovery. Link to comment Share on other sites More sharing options...
btm24 Posted October 26, 2010 Author Share Posted October 26, 2010 Yeah i know about what the hooks are made for but I will be having a bracket made for them to work on the truck. they will be made right so they won't just fly off when yanked on. Thank you for the warning tho. Brandon Link to comment Share on other sites More sharing options...
Bounty Hunter Posted October 27, 2010 Share Posted October 27, 2010 Do they have a weight rating on them? They're designed for use with a static load, not for the forces involved in vehicle recovery. Link to comment Share on other sites More sharing options...
btm24 Posted October 27, 2010 Author Share Posted October 27, 2010 Yes i think its 20k + but i can look tomarrow. I think but am not 100% sure that i understand the amount of pressure that recovery puts on things like hooks, so as far as i know they will be fine with the right type of bracket but if i am wrong just let me know. thanks Brandon Link to comment Share on other sites More sharing options...
Bounty Hunter Posted October 27, 2010 Share Posted October 27, 2010 Do as you will, but here's the correct hooks for recovery: Link to comment Share on other sites More sharing options...
snowboard3r411 Posted October 27, 2010 Share Posted October 27, 2010 where did you get your build specs from and also what tool box did u use? Link to comment Share on other sites More sharing options...

Recommended Posts
Create an account or sign in to comment
You need to be a member in order to leave a comment
Create an account
Sign up for a new account in our community. It's easy!
Register a new accountSign in
Already have an account? Sign in here.
Sign In Now